Photography Concept 3: Depth of Field
The concept of Depth of Field (DOF) is one of the key ingredients in cooking up a successful photograph. In simple terms, DOF is the distance in front of, and behind your subject within which objects are within an acceptable level of focus or sharpness. A shallow depth of field means that the sharpness of objects falls off within a short distance in front of or behind your main subject. A deeper, longer or greater depth of field would mean that objects further in front of or behind your main subject are within an acceptable level of sharpness.
There are two major reasons for wanting to control the depth of field when making a photograph:
- To isolate a subject from its background (using a shallow DOF)
- To better capture objects in the foreground or background of a photograph (using a greater DOF)
One of the most prevalent uses of a shallow DOF is when you're taking a shot of a person or animal. You choose a shallow DOF to more effectively isolate that person from the background. This can be quite pleasing, and many times this will distinguish your photograph immediately from the typical snapshot.
Maximum depth of field is many times utilized in landscape photography where you want to capture foreground, middleground and background objects all with an acceptably high degree of sharpness.
Of course shallow and deep DOF is not limited to one genre of photo or another. DOF can be used in many different situations for many different purposes. This is what makes photography such a creative endeavour!
So how do you control depth of field? The amount of DOF achieved is dependent on the aperture, distance to your subject and focal length of the lens. There are many online DOF calculators you can use to calculate the DOF (one of which is here), but for the purposes of this series of posts I think it's more important to give some rough guidelines just to illustrate the concept. You can invest more time in it depending on how important an accurate DOF is to you and your photography.
If you want to isolate a person or object by blurring out the background (and foreground) there are a few things you should do:
- Use a wide aperture (small f-stop number) - this will depend on the maximum aperture of the specific lens you are using
- Use a longer focal length - although the focal length you choose will likely be governed more by the composition of your photograph than the DOF you're trying to achieve
- Maximize the separation of your subject and the background - put the background further outside of your DOF
If you want to capture a greater depth of field - for instance when you want to include both your friends and the amazing backdrop in the photo and get them both sharp - then there are a couple of things to remember:
- Use a smaller aperture (large f-stop number)
- Use a shorter focal length
Keep in mind the lessons learned in part one of this series. If you're going to keep your overall exposure correct, then you must balance a smaller aperture with a slower shutter speed (and vice versa for a larger aperture). So many times you will find that if you want to maximize the DOF (say using an aperture of f/22) you might end up with a shutter speed that is relatively slow. This might give you a blurry shot if you don't use a tripod to keep the camera rock-steady during the time the shutter is open.
Some other points:
Many DSLR's come with a DOF preview button. Normally when you're looking out the viewfinder of your camera, you're always looking through the lens at it's widest aperture (so the viewfinder image is bright). When you press the DOF preview button, the viewfinder image will darken but you will get a truer sense of what the captured DOF will be. This is indispensible if getting the right DOF is critical to you.
Don't always go for the absolute shallowest possible DOF for those portrait shots of your kids (I'm guilty of this on many of my shots). While it does isolate the subject, you also want to make sure that important areas are not blurred. It is quite possible to find that the eyes of your subject might be sharp while the nose ears are slightly soft and slightly out of focus.
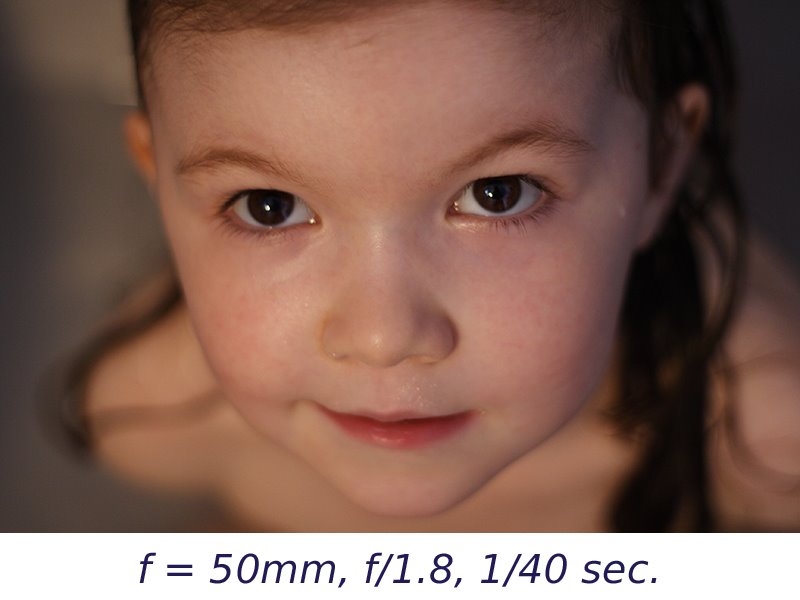
Here's a shot with a shallow DOF. In this case I used a wide aperture (f/1.8) and as you can see, only her face is in focus. Her shoulders and hair are blurry. In this case I liked the very shallow DOF (even her chin is not entirely in focus) and felt it added to the image.
 [click on the image to see a larger version]
If you're going for a very large DOF and finding that you're without a tripod or you need to maintain some minimum shutter speed, don't forget that you can boost your shutter speed by changing to a higher ISO setting. This is something you couldn't really do very quickly on a film camera. And with the increasing quality of digital sensors these days, you can get by with an ISO of 400 or 800 with a still-acceptable level of image noise. This can sometimes mean a critical boost in shutter speed which might let you get a sharp shot when you're without a tripod or other stabilizing device.
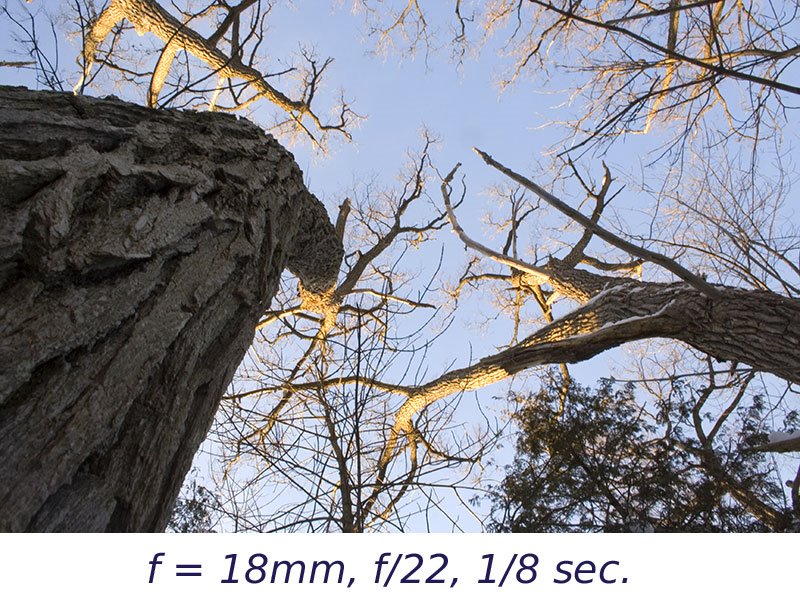
Here's a shot looking up a tree. I wanted to capture the texture of the bark immediately close to the lens and maintain focus up to the top branches. In this case I went with a small DOF (f/22). You'll notice that the shutter speed is relatively slow, so I ended up bracing my camera against the tree to keep it still while the shutter was open.
 [click on the image to see a larger version]
If you're into macro photography you will find yourself trying to maximize the DOF. As you move closer to your subject the DOF becomes very very short. In many cases you want the blurred background but at the same time you might have trouble keeping the entire object in focus.
Here is a shot of my rings with what ended up being insufficient DOF. Notice that the back area of the rings is out of focus.

[click on the image to see a larger version]
This is really the super-basic layman's version of DOF. It's a tool that you will find yourself considering more and more each time you take a photograph. As usual I've only covered the basics, but it's enough to allow you to experiment and get your own feeling for it. And as with so many types of learning, reading about it is never worth the value of actually doing it, so get out and experiment!
[update: I see that Kent Newsome has illustrated the concept of shallow DOF in his recent post Handstands. Notice the focus increase and then drop off as you pass the middle couple of Polly Pockets. Nicely done.]
Additional Interesting Link: Here's a decent online SLR simulator which lets you play around with the aperture and shutter speed settings to give you a feel for exposure and depth of field. [Link]


0 comments:
Post a Comment